- Essentials
- Getting Started
- Datadog
- Datadog Site
- DevSecOps
- Serverless for AWS Lambda
- Agent
- Integrations
- Containers
- Dashboards
- Monitors
- Logs
- Tracing
- Profiler
- Tags
- API
- Service Catalog
- Session Replay
- Continuous Testing
- Synthetic Monitoring
- Incident Management
- Database Monitoring
- Cloud Security Management
- Cloud SIEM
- Application Security Management
- Workflow Automation
- Learning Center
- Support
- Glossary
- Standard Attributes
- Guides
- Agent
- Integrations
- OpenTelemetry
- Developers
- Authorization
- DogStatsD
- Custom Checks
- Integrations
- Create an Agent-based Integration
- Create an API Integration
- Create a Log Pipeline
- Integration Assets Reference
- Build a Marketplace Offering
- Create a Tile
- Create an Integration Dashboard
- Create a Recommended Monitor
- Create a Cloud SIEM Detection Rule
- OAuth for Integrations
- Install Agent Integration Developer Tool
- UI Extensions
- Service Checks
- IDE Integrations
- Community
- Guides
- API
- CoScreen
- Cloudcraft
- In The App
- Dashboards
- Notebooks
- Alerting
- Infrastructure
- Metrics
- Watchdog
- Bits AI
- Service Catalog
- API Catalog
- Error Tracking
- Service Management
- Infrastructure
- Application Performance
- APM
- Continuous Profiler
- Database Monitoring
- Data Streams Monitoring
- Data Jobs Monitoring
- Digital Experience
- Real User Monitoring
- Synthetic Monitoring
- Continuous Testing
- Mobile Application Testing
- Software Delivery
- Security
- Security Overview
- Cloud SIEM
- Cloud Security Management
- Application Security Management
- Log Management
- Observability Pipelines
- Log Management
- Administration
Enable SSO with Azure AD
Enabling Single Sign-On (SSO) with Azure AD as your identity provider allows you to simplify authentication and login access to Cloudcraft.
This article helps you set up SSO if your identity provider is Azure AD. For other identity providers, see the following articles:
For more general information on using SSO with Cloudcraft, check out Enable SSO in Your Account.
Setting up SAML/SSO
The SAML Enterprise SSO feature is only available for the Enterprise plan, and can only be configured by the Cloudcraft Account Owner role.
- In Cloudcraft, navigate to User > Security & SSO.
- The details you need to create a new application with Azure can be found in the Cloudcraft service provider details section.
- Log in to Azure as an administrator.
- Click the hamburger menu on the upper-left corner of the screen and select Azure Active Directory.
- In the Manage section on the left menu, click Enterprise applications.
- Click New application and select Non-gallery application.
- Enter Cloudcraft as the name of the application, then click Add.
Next, configure the SAML integration using the details provided by Cloudcraft.
- In the Getting started section, select Set up single sign on, then click SAML.
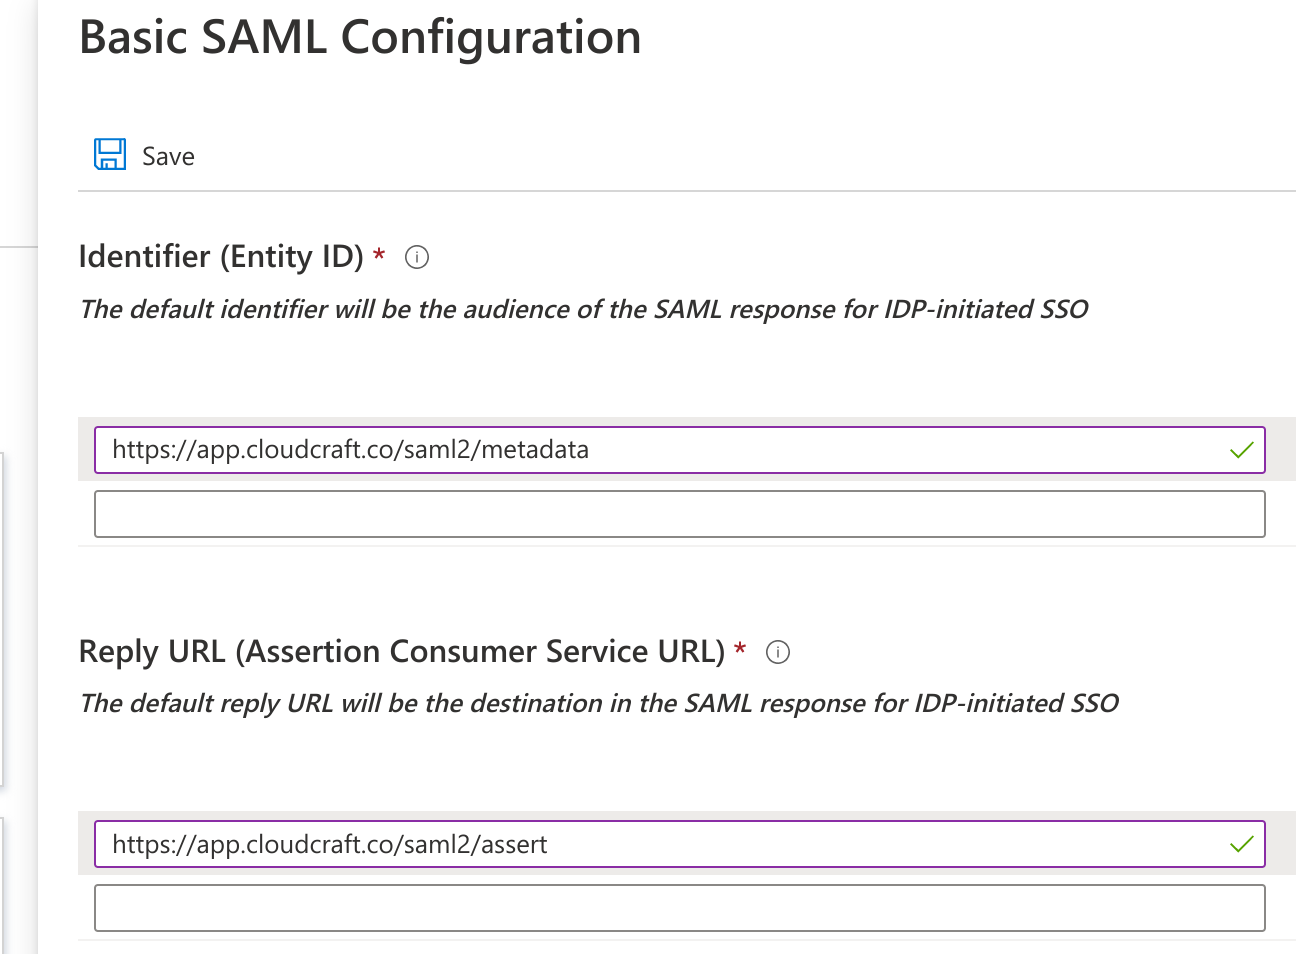
- Under the Basic SAML Configuration section, click Edit.
- Enter the details provided by Cloudcraft. The fields are mapped as follows, with the first value being the label in Azure AD, and the second being the label in the Cloudcraft dialog.
- Identifier: Service Provider Entity ID
- Reply URL: Assertion Consumer Service URL
- Sign on URL: Leave this blank to allow identity provider-initiated SSO
- Click Save to return to the previous screen.
- Under the SAML Signing Certificate section, select Federation Metadata XML and download the XML file to your computer.
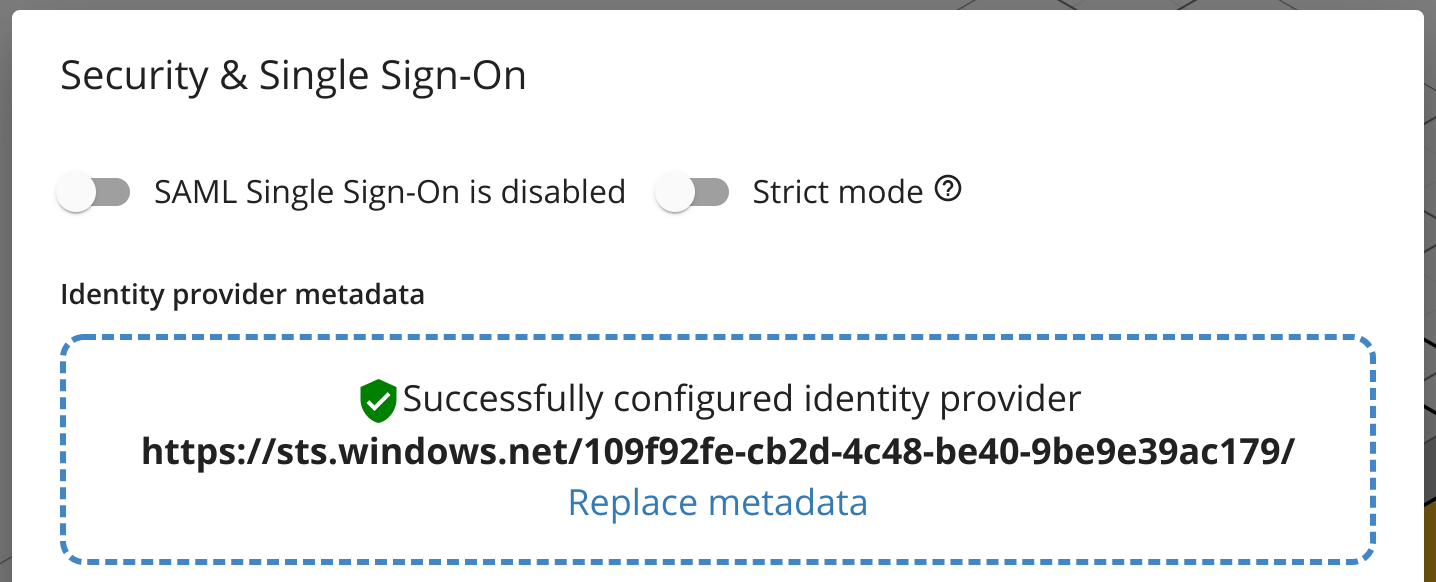
- Navigate back to Cloudcraft and upload your metadata XML file.
- Toggle the SAML Single Sign-On is enabled option.
- Navigate back to the Azure portal.
- Under the Test single sign-on with Cloudcraft section, click Test to test your integration.
- If you prefer to have your users access Cloudcraft only via Azure AD, enable the Strict mode option, which disables all other login methods.
Note: To grant access to users in your organization, see the Azure AD documentation.


